I posted this craft over at Paper Crave recently, but I was so happy with how it turned out that I wanted to share it over here, too. My inspiration for these cupcake liner trees came from the cover of Martha Stewart Weddings’ 15th anniversary issue, which featured a gorgeous sugar flower cake by Sylvia Weinstock on the cover. I thought that the ridged flower petals looked a little like cupcake liners, and that planted the idea for this craft in my head.

When I first attempted to make a tree, I used full size cupcake liners, but I felt that they were too large for the look that I was going for. Then I remembered this great cupcake liner flower tutorial from Intimate Weddings, which used mini cupcake liners, and I used this as a jumping off point to create the flowers on the cupcake liner tree. The mini liners worked out perfectly!
The cupcake liner trees are versatile decorations and would be at home as an embellishment on a reception dessert table or on display for any holiday, and you can use different colors and patterns for different looks. Red and white striped liners would be great for circus or retro themed parties, and I’m already planning on making a Halloween tree using black liners. Here’s a shop with lots of mini cupcake liner choices to inspire you.
You can easily change the look of the tree by adding decorative embellishments, too. Using a wire cutter, I disassembled a holiday berry pick from the craft store and used the berries to create a Christmas version of the tree:

I used one full mega pack (350 count) of the mini white baking cups (1 1/4″) from Wilton to cover one tree form, but I think that the 1 3/8″ size would work also work very well since there’s not much of a size difference. It took me a little less than two hours to put together my first tree, and since I had most of the supplies on hand already, the only thing I really needed to purchase for the craft was the baking cups, which were about $4 (less with a Jo-Ann coupon). If you had to purchase everything to make the trees, then I think you’d spend around $20, but the pins, glue gun, and glue sticks would last for several trees.
Okay, are you ready for some scrunching action?
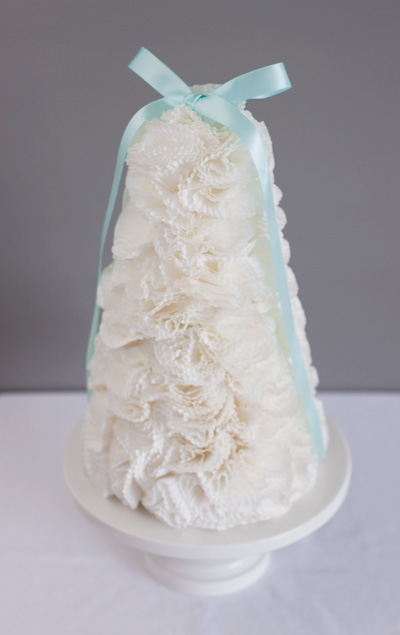
DIY Cupcake Liner Flower Trees
Supplies you’ll need:
a styrofoam tree form (I used a 9” tall form)
mini cupcake liners (1 1/4” to 1 3/8” size)
straight pins, preferably with a ball head
a hot glue gun and glue sticks
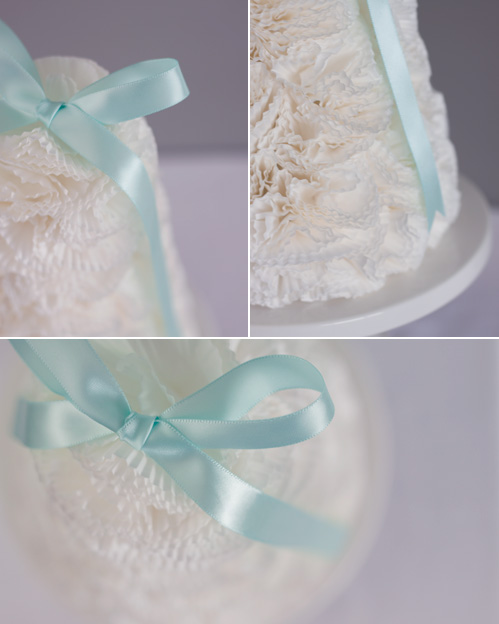
accessories for decorating (ribbon, decorative picks, etc.)
Directions
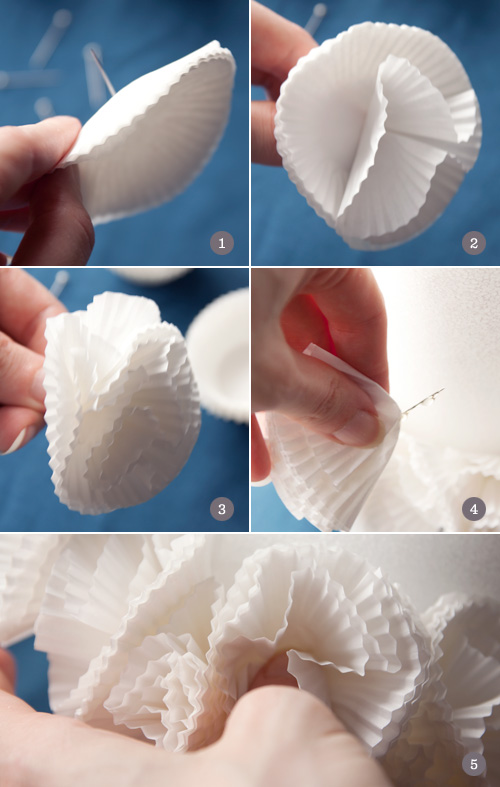
1. Separate cupcake liners into groups of five. Flatten the liners, and poke a straight pin through the center of each group.
2. Gently “scrunch” the top cupcake liner around the pin head, taking care not to rip the paper.
3. Repeat the scrunching action for the remaining liners. When you’re finished, you’ll have a flower.
4. Using your thumb and forefinger, grab the flower at the bottom and press the liners together and away from the length of the pin. Add a bit of hot glue to the pin, and immediately insert into the styrofoam tree form.
5. Fold two or three layers of the liners over the pin head, taking care not to burn yourself on any hot glue that may have found its way toward the pin head, and press the pin head in until it’s flush with the tree form. Hold in place for five to ten seconds, until the glue starts to cool and the pin is firmly attached. Fluff and adjust the flower “petals”, if needed. Continue adding cupcake liner flowers, starting at the bottom of the form and working your way around and up, until the entire form is covered. Add embellishments and decorations to the tree to coordinate with your occasion, if desired.
images by Kristen Magee
Posted in Craft, Tutorials | 18 Comments »
This is so pretty! What a clever idea. The tutorial pics brought back memories of all the tissue flowers we made as kids. Nothing as lovely as these trees though!
posted: August 5th, 2010 at 3:42 pmThis is LOVELY! I have to repost this for my spanish readers! You always inspire =) I used your pom pom design for a baby shower recently http://www.perachapita.com/2010/05/temaspompones.html
posted: August 5th, 2010 at 6:19 pmThanks for sharing!
[…] some cupcake liner trees using a tutorial from […]
posted: August 9th, 2010 at 8:47 amWow, that is so cool! Thanks so much for figuring this out, I love them! I’ll be linking to this.
posted: August 12th, 2010 at 1:56 pmHow neat! The results are really quite stunning – thank you for sharing the how-to!
posted: August 12th, 2010 at 6:05 pmgorgeous! I want one in blue!
posted: August 13th, 2010 at 1:10 amIts very cute and easy as well.thanks for sharing!!!
posted: August 14th, 2010 at 5:09 am[…] cupcake liner trees are on my crafting to-do list (@ Domestic […]
posted: August 18th, 2010 at 7:02 amVery pretty! I wonder if it would look just as good if you used holiday cupcake liners at Christmas?
posted: August 20th, 2010 at 3:03 pmOmg, this is an amazing idea, a genius idea actually!!! Probably one of the BEST things i saw in a long time!! Congratulations!!!!
posted: August 24th, 2010 at 9:54 amThanks so much for your kind words, everyone!
Amy – I’d really like to try it with patterned holiday liners. I think it would look pretty cute! Let me know if you try it; I’d love to see the results.
posted: August 24th, 2010 at 10:24 am[…] On our word these are oodles of cuteness cupcake liner trees!!!! – Domestifluff […]
posted: August 29th, 2010 at 6:44 amI looked up that cake on MS’s website and found an even better pic: http://images.marthastewart.com/images/content/pub/weddings/2010Q1//mw105245_0110_roses2_xl.jpg
It shows just how true your version is to the original!
I have only recently found your blog and as a gluten-free crafty type person myself I am really looking forward to working my way through the archive
posted: August 30th, 2010 at 6:44 amTHank you so much for your ice cream recipe (Aug 2009). I have just spent months on a diabetic diet for my pregnancy and when my baby was born he began to show milk allergy symptoms… Well, I am an ice cream JUNKIE but I have been trying to find a way to make my ice cream softer. Thank you for your work to perfect your recipe. I can’t wait to try it!
posted: September 11th, 2010 at 2:49 am[…] a month or so ago I ran across this blog […]
posted: September 16th, 2010 at 7:41 pmwow Kristen, this is gorgeous! i’m going to link to this on my international blog linking party this week, and would love to see you there sometime too! all the best!
posted: September 18th, 2010 at 7:12 pmHow have I missed this until now?! Oh so pretty!
posted: October 31st, 2010 at 11:43 amSuper cute! Love the add on ornaments.
posted: May 11th, 2011 at 7:47 pm