
I have a thing for flowers that look like pom poms. Mums, allium, chive blossoms, dahlias – love ‘em! Since fresh flowers aren’t always in the budget, and because I have a brown thumb, I started thinking about what I could do to brighten up our apartment with flowers without actually using flowers. Soon, the idea for some sort of pom pom flower started bouncing around in my head, and this is what I came up with.
How to make pom poms? I googled around and found a number of tutorials, including several that use the cardboard donut method, which can be found here, here, and here. Unfortunately, I’m impatient and not particularly coordinated, so cardboard donuts were flying everywhere. My favorite method is found in the pom pom tutorial at Bella Dia. This method makes slightly more yarn scraps, but you can recycle the scraps by using them as stuffing for craft projects, or you can put them in a small fabric pouch and add a few drops off lavender, rose, or another type of essential oil to make a drawer sachet.
Though my method basically follows the Bella Dia tutorial, I have made some slight variations, so I’ve posted my method below.
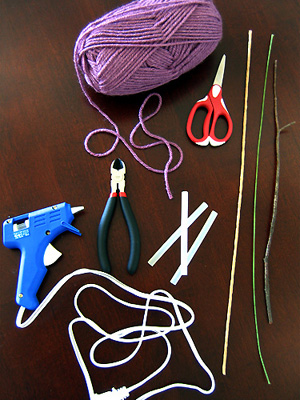
What you’ll need for the project:
yarn
small, sharp scissors
wire cutters
a hot glue gun and glue sticks
materials for the stems (paper or fabric covered floral wire or my favorite, branches or twigs)
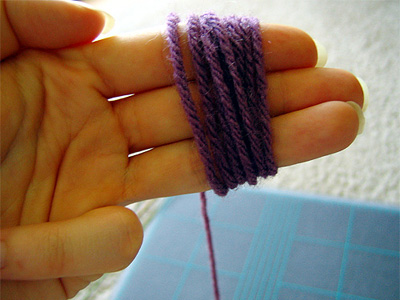
Using your thumb, hold the end of the yarn against your fingers as you begin to wrap the yarn. After a few wraparounds, you should be able to let the end go and continue wrapping. I size my pom poms by fingers: 2 is small, 3 is medium, and 4 is large. Don’t wrap the yarn too tightly, or you’ll have blue fingers and won’t be able to slip the yarn off easily later!
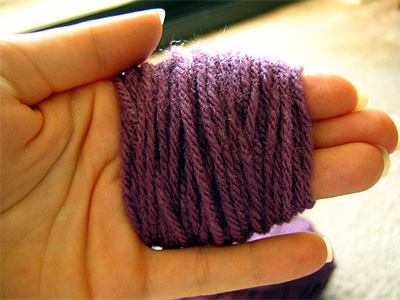
The more times you wrap the yarn, the fuller your pom pom will be. However, try not to overdo it, or you may have trouble in the later stages because there’s too much bulk. For small pom poms, I wrap between 50-75 times; for medium, 75-100; for large, 100-125. Yarns come in many different thicknesses, so you may find that you need more or less wraps to achieve the fullness that you’d like.
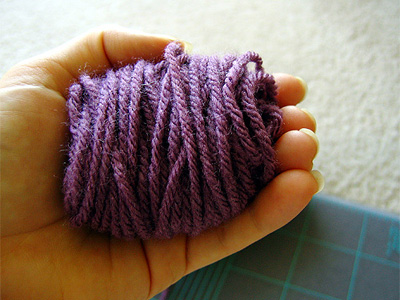
After you’ve finished wrapping the yarn, carefully slide it off of your fingers.

Cut a piece of yarn that is between 4 and 6 inches long to use as a tie. Place the wrapped yarn on top of the cut piece, trying to center it as much as possible.
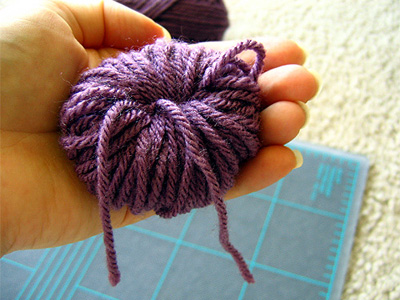
Pull the cut yarn as tightly as you can over the wrapped yarn, and tie a knot.

Using a small pair of sharp scissors, cut the top of the yarn loops th entire way around.
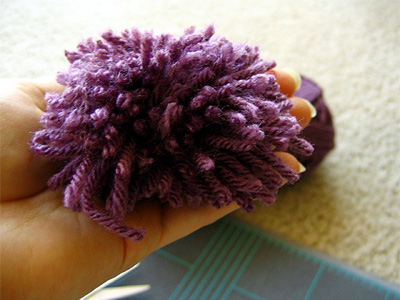
After you cut all of the loops, you’ll be left with a shaggy looking pom pom.
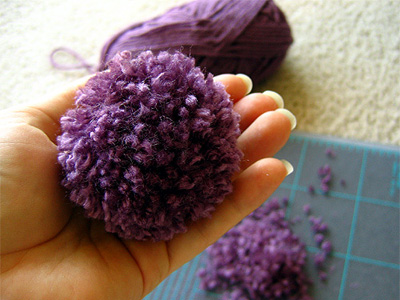
Using your scissors, trim off the longer pieces of yarn until you’re satisfied with the appearance of the pom pom. Fuzzy!
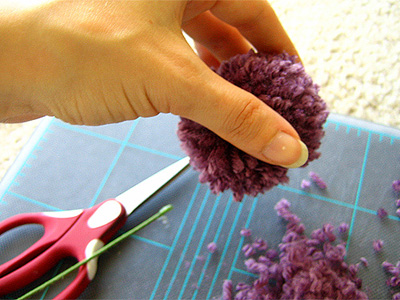
Fire up your glue gun, and find a place on the pom pom where the yarn looks a tad sparse or where things are a bit flat or uneven. Basically, you’re looking for a good place to glue the stem. Part the yarn to expose the more dense area of the pom pom. This will make a sturdy anchor for your stem. Apply a small amount of hot glue to your choice of stem, and press into the exposed anchor area.
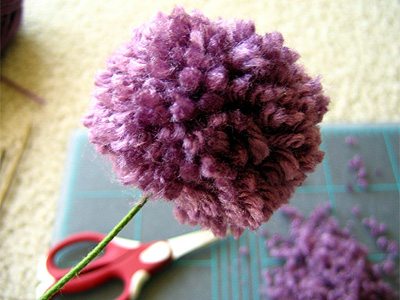
Ta da! You’ve got a pom pom flower.
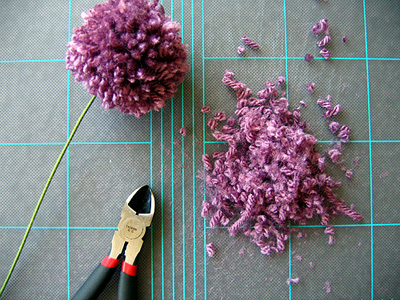
Use wire cutters to trim the stem to the desired length, and have fun figuring out where you’re going to put your flower!
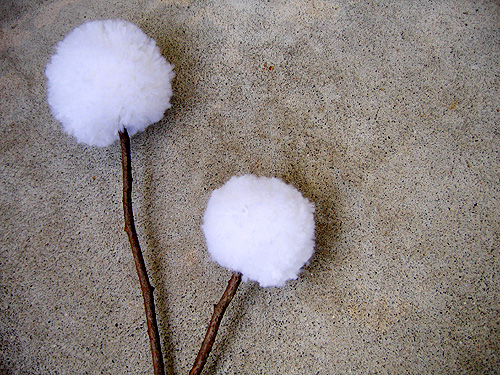
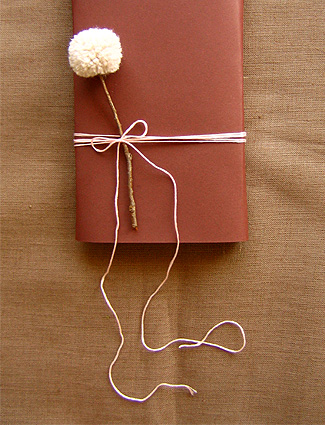
Posted in Craft, Tutorials | 162 Comments »

Great tutorial! I can see myself making these to adorn gifts!
posted: October 31st, 2008 at 1:36 pmWell how cool is that? I share your pom-pom flower love – great idea here!!
posted: November 7th, 2008 at 12:50 amThose look neat. I suck at craft projects and mine would so not turn out like that.
posted: November 10th, 2008 at 4:22 amThanks, everyone!
peabody – I’m about 50/50 when it comes to both craft and food experiments. And the 50% that fail are usually real messes. Thankfully, this was a success, and I’m sure if you gave it a go you’d be pleasantly surprised by the result!
posted: November 10th, 2008 at 8:09 pmWell, now I will have to go collect some sticks on my way home from work so I can make this lovely project!
posted: December 3rd, 2008 at 5:08 pmAllison – yay for free craft supplies!
posted: December 9th, 2008 at 1:20 pm[…] Domestifluff – How to Make Pom Pom Flowers […]
posted: December 14th, 2008 at 11:35 amThese are a great idea!! Thanks for sharing!! And, thanks for all the pictures along the way! They make tutorials much easier to follow, in my opinion.
posted: December 14th, 2008 at 3:40 pm[…] yapımı size neşeli zaman geçirmenizi sağlayacak. nasıl yapıldığını öğrenmek için tıklayınız. habergentr_title = ‘Bu Çiçekler Gerçek değil!'; habergentr_description = ‘El yapımı pom […]
posted: December 16th, 2008 at 7:52 amthese are absolutely positively gorgeous! I will most definitely be using this tutorial for my future crafts. Thank you so much for posting it.
posted: December 22nd, 2008 at 5:25 pmI’m so glad that everyone is enjoying the tutorial! Thanks so much for your wonderful comments!
posted: December 23rd, 2008 at 1:28 pm[…] 5, 2009 · Filed under Uncategorized I found these super cute pom pom flowers over at Domestifluff. They are adorable little accents for gifts or would look really cute across a place setting at a […]
posted: January 5th, 2009 at 4:37 pmWhat a lovely simple idea! I haven’t made pompoms for years and I love those. Do you mind if I blog about your tutorial when I’ve made some?
posted: January 7th, 2009 at 5:58 amThank you, Joanne! I think it would be great if you blog about the tutorial when you’ve made some.
posted: January 7th, 2009 at 11:25 ami heart this! just ADORABLE!
posted: January 8th, 2009 at 3:11 pmLove pom poms! The white with the twigs are my fave. =)
posted: January 8th, 2009 at 7:09 pmI love that lamp. Where does it come from? The pompom are adorable too.
posted: January 8th, 2009 at 7:23 pmWhat a great idea, thanks!
posted: January 8th, 2009 at 9:16 pmThanks so much, Kate, Carrie, and Andi!
Savvy – I actually purchased the lamp at Lamps Plus (link goes directly to the lamp). It actually looks like they’re on a great sale right now!
posted: January 9th, 2009 at 11:24 amThank you so much. This is a great site. But is that the same lamp? Yours looks like it is shaped a little differently.
posted: January 9th, 2009 at 12:26 pmThe lamp base does look a little more “rounded” on the Lamps Plus site, but if you click on the “In Scene” photo, I think it looks more accurate. Plus, in the picture I took there was a dark shadow around the underside of the base, which doesn’t help because it makes the base appear flatter. It’s the same lamp, though!
posted: January 9th, 2009 at 9:06 pmThose are super cute! I am making some when I can find the scissors…I love the vase you put them in! I want one! haha
posted: January 10th, 2009 at 4:51 pmI was skeptical when I started reading, but it turned out very neat and looks great as a decoration on the package. I want to try this with hand spun yarn!
Keep up the great posts!
posted: January 13th, 2009 at 1:05 pmMade them……love them.
posted: January 13th, 2009 at 5:18 pmawesome! it would look really cool if you did multi-colored ones!
posted: January 13th, 2009 at 8:12 pm[…] Make pom pom flower […]
posted: January 15th, 2009 at 9:23 amMegan – Thank you! The vase is from J. Mendocino, and I love it!
Brandon and Sandi – So glad to hear that you made them and that they turned out so well!
Lynn – Thanks! I have tried some multi-colored ones, and they do look cute. I’ve also experimented with using embroidery and crochet thread with the yarn, and that looks pretty neat, too.
posted: January 16th, 2009 at 11:36 am[…] | Domestifluff Más noticias sobre: Manualidades con Flores, Tecnicas Tags: lana, Manualidades con […]
posted: January 17th, 2009 at 8:40 amI was just trying to figure out what to do with my small yarn scraps today. This is perfect!
posted: January 31st, 2009 at 8:14 pmohhh, cute!!! is perfect!!!
posted: February 3rd, 2009 at 1:51 pmThanks for the cuuute idea! My dad will be thrilled when I go get sticks for this–I’ll be crafting and cleaning up the yard at the same time!
posted: February 6th, 2009 at 2:24 pmI made these this weekend and they came out amazing! Thanks for the detailed tutorial. It made it so easy for me to walk thru it step by step myself.
posted: February 8th, 2009 at 10:00 pmWhat a great idea, thanks!
posted: February 13th, 2009 at 4:32 am[…] […]
posted: February 16th, 2009 at 9:04 am[…] make! I specially love the one above with twigs as stems – don’t they look like cotton balls? Domestifluff teaches how to make them step by […]
posted: February 17th, 2009 at 7:58 am[…] original aqui- em […]
posted: February 24th, 2009 at 10:59 pm[…] Domestifluff encontrarás un manual detallado de como se pueden realizar, como así también de los materiales a […]
posted: March 2nd, 2009 at 2:35 pm[…] pom-pom flowers (my latest obsession, shown here on my new dressing table); […]
posted: March 16th, 2009 at 5:35 pmWe used to make plastic pom-poms the same way except we wrapped colored plastic around a piece of wood with 2 grooved ends for the twist-tie to go through and the other side was for the scissors to cut through. We made hundreds to decorate the cars in the wedding party
posted: March 25th, 2009 at 3:58 am[…] at Domestifluff over the past few months! I’m so flattered that people are enjoying the pom pom flowers and retro utensil stencils, and I hope to have many more crafts for you in the coming weeks and […]
posted: March 25th, 2009 at 2:46 pm[…] ….Pom Pom Flowers […]
posted: April 1st, 2009 at 6:15 pm[…] 21. Pom-Pom Flowers via Domestifluff […]
posted: April 16th, 2009 at 6:51 amThank you for putting this up. My grandmother always put these on the slippers she crocheted for us and I couldn’t figure out how to make them.
posted: April 21st, 2009 at 11:25 pmTotally addicted to making these whilst watching tv (I even brought wool specially for this after seeing this tutorial!). Thanks so much for sharing.
posted: May 22nd, 2009 at 7:28 pmI tried and tried and tried to make these but I could not shape them into a perfect circle. I think I’ll have to try again because I want to use them everywhere!
posted: June 12th, 2009 at 12:46 amYour flowers are so cute: thanks for the tutorial!
posted: June 12th, 2009 at 6:38 amsooo sweet & just darling. thank you kindly heaps for this fantastic, clear tutorial. i totally need to try this, now! ;D
posted: June 12th, 2009 at 1:11 pm[…] I forgot how I came across this fantastic tutorial… […]
posted: June 12th, 2009 at 4:28 pmThanks so much, everyone, for the great feedback. I’m so happy to see that this tutorial is still one that people want to try. And I love everyone’s pom pom stories!
Cindy – I’m sorry to hear that you’re having problems getting the pom poms to be circular. Sometimes I have to keep trimming the bits of yarn to get a nice circle. From time to time I still end up with a side that’s uneven or flatter, and I just glue the flower to the stem on that end. Perfect fix!
posted: June 12th, 2009 at 9:11 pmoh, what a wonderful idea. I’ve made pom-poms before, but never thought to attach to stick as a flower. brilliant!! now, my quest for billy buttons is over – this is a much better substitute! Thanks!!
posted: June 14th, 2009 at 6:42 pmI LOVE this tutorial! I didn’t do too well with the pom pom maker I got from Japan, but your tutorial is so easy and I just had to blog about it
posted: June 15th, 2009 at 1:42 pmhttp://fatninjainyoface.blogspot.com/2009/06/diy-pom-poms.html
These are great! I can’t believe how good the yarn looks. Linked to them from my blog, thanks!
posted: June 16th, 2009 at 1:32 pmI just posted a picture of my version of your flowers over my Blog ! Thanks a lot! They look amazing !
posted: June 19th, 2009 at 7:38 pm[…] DIY: Pom-Pom Flowers Using Yarn In Decor, Flowers, diy, fabric flowers on June 20, 2009 at 7:42 pm Domestifluff.com’s: Pop-Pom Yarn Flowers […]
posted: June 20th, 2009 at 3:42 pm[…] at Domestifluff found via One Pretty […]
posted: June 26th, 2009 at 8:52 pm[…] ideas: Paper crane shadow box (center piece?) Pom pom flowers Tissue paper flowers Wedding […]
posted: July 22nd, 2009 at 6:53 amthanks for sharing! love doin’ little pom-poms! simple and neat design for our wedding invitation!
posted: July 22nd, 2009 at 11:27 amI’ve never seen pompoms made without a paper template before. I really want to make some now. I used to love making robin pompoms at Christmas.
posted: July 28th, 2009 at 10:30 amWhat a great idea! Thanks for posting the tutorial. I need to find some yarn to try and make a few. Its a cute addition to a handcrafted gift.
posted: July 29th, 2009 at 8:04 pmI love and hate you(just kidding) at the same time for coming up with something so beautiful, yet so simple. To me that is truly art at its finest. Bravo!
posted: August 22nd, 2009 at 11:52 pm[…] A tutorial at Domestifluff on making pom pom flowers with yarn and twigs – very pretty and quite easy to make. Kristen […]
posted: September 2nd, 2009 at 1:36 amThanks for the great tute! Perfect for a crafter feeling under the weather. So easy and quick, makes me smile! LOVE THEM!!!!
posted: September 4th, 2009 at 6:55 pm[…] is the tutorial for the frayed fabric rosettes, and the tutorial for the yarn pom-pom flowers. craftsdiyflowers7 CommentsFabric Flower […]
posted: September 9th, 2009 at 12:20 pm[…] Inspired by this tutorial here. […]
posted: September 10th, 2009 at 9:22 amHow Cute?! Beautiful ideas, great HP
posted: September 11th, 2009 at 7:44 am[…] I posted it last October, my little pom pom flower tutorial has been one of the most popular posts on the site. I’ve been so happy to see all of the […]
posted: September 24th, 2009 at 11:37 amLove this, I have put them on top of crocheted hats before. Never thought of them as decoration, I can’t wait to try it! Thanks
posted: September 25th, 2009 at 2:49 pm[…] I read Kristen’s blog a LOT — love it, even though I’m not gluten free! at domestifluff.com, and have seen her pom-pom flowers before (see here). […]
posted: September 25th, 2009 at 3:16 pm[…] came the pom pom flowers tutorial […]
posted: September 30th, 2009 at 10:03 amthese are beyond adorable. i love them! can’t wait to try them.
posted: September 30th, 2009 at 11:03 am[…] poms make me happy. Get the tutorial {here}, and get pom pom free printables {here}, found via {here}. « Oragami […]
posted: September 30th, 2009 at 1:47 pmThis is such a beautiful and unique tutorial! Thank you for sharing.
posted: September 30th, 2009 at 1:50 pm[…] myself which now sits neglected in a big basket inside my closet. So when I came across this idea, I immediately pulled out my stash and made a […]
posted: October 1st, 2009 at 10:21 amI LOVE this tutorial. What kind of yarn do you recommend…I tried one with some 3 Ply/Sport yarn that I had lying around and the pom-pom was not “fluffy” looking at all the yarn just looked “string” still. Any suggestions? THANKS for such awesome sites!!!
posted: October 1st, 2009 at 6:47 pmYour blog is amazing! I just popped over from Design Crush. I’ll definitely bookmark and come back and visit more.
posted: October 2nd, 2009 at 10:20 amMelissa – the Vanna’s Choice by Lion Brand and Red Heart Designer Sport yarns have worked the best for me. Both seem to have the right “fluff” factor for the pom poms. Hope this helps!
posted: October 5th, 2009 at 12:41 pm[…] of the ways you can use these cute little Pom poms for decoration. More ideas and the complete tutorial can be found on the Domestifluff […]
posted: October 7th, 2009 at 11:33 am[…] But what I have for you today is the old timer kind – yarns. Domestifluff has an easy step-by-step tutorial over her blog. I am curerntly itching to make some for my front door. Spiders are a good choice for […]
posted: October 12th, 2009 at 8:01 am[…] Pom Pom Flowers Tutorial by Domestifluff […]
posted: October 13th, 2009 at 2:39 pm[…] first made these pom pom pumpkins last year when I did the flowers, but by the time I posted the pom pom flower tutorial I felt that it was probably too late in the […]
posted: October 15th, 2009 at 10:43 am[…] de lã, que ficarão super lindas como enfeites, ou também para dar de presente a alguém. Estas delicadas flores pom pom são muito fáceis de fazer, e certamente você irá gostar tanto quanto […]
posted: October 29th, 2009 at 2:12 pmin love.
posted: November 4th, 2009 at 12:56 amthese are wonderful!!! so so pretty… hope u don’t mind I use these
posted: November 4th, 2009 at 2:39 pmThis tutorial is by far the easiest I’ve ever encountered! Thank-you so much. This is amazing. I will make me some and post them on my blog. You will get full credit, of course. xo
posted: November 4th, 2009 at 8:06 pmthanks so much! I’m obsessed.
http://www.flickr.com/photos/jennifermartin/4076917870/
posted: November 4th, 2009 at 10:52 pmLove this idea. I’ve been looking for something unique and different to embellish my work and this just might be it! Thank you!
posted: November 9th, 2009 at 11:06 am[…] Pom-pom flowers via Domestifluff. I had no idea these were so simple to make! Time consuming, perhaps, but simple none-the-less. Pretty pom-poms at work here and here. […]
posted: November 30th, 2009 at 4:06 am[…] you can do with pom poms… make fake flowers that look like clover flowers… here is a link to the […]
posted: December 2nd, 2009 at 2:36 am[…] miss when we move) and just couldn’t resist this gorgeous silk/merino Malabrigo after seeing this. It was a delightful way to spend a couple of hours on the back porch – you know, preparing for […]
posted: December 2nd, 2009 at 7:37 amHi!
Today I posted an entry on my blog with a link to this tutorial.
I’d appreciate your letting me know if that was OK.
Thanks,
Nancy Ward
posted: December 2nd, 2009 at 2:07 pmhttp://paperfriehndly.bolgspot.com
[…] the pom poms! Really simple to do and fun as well, there is a great tutorial at Domestifluff. Make as many as you like, I only made two. Hang them over the edge for a cute detail. I’d […]
posted: December 4th, 2009 at 1:29 pm[…] used this tutorial to make poms to add to the wreath we have on our door. I just left the yarn the […]
posted: December 7th, 2009 at 4:44 am[…] It has really felt like Christmas for me lately. With finishing design projects, taking care of moving business, and actually moving to SF and finding a place… all before Christmas; my mind has been elsewhere. However, with yesterday’s first snow fall in the morning; and ending my day with some inspiring Christmas words; I’m starting to feel the Christmas spirit. How fun are these adorable little pom-poms to wrap gifts with? I love the simplicity and charm. Tutorial found here. […]
posted: December 7th, 2009 at 12:17 pmSoooo incredibly cute! I NEED to make some of these!!
posted: December 10th, 2009 at 8:57 am[…] yarn pom pom tutorials here or here […]
posted: December 16th, 2009 at 11:43 am[…] to try something new that I could use up supplies that I have! I found a great tutorial through domestifluff (via Bleubird Vintage) and while she decided to make a lovely pompom wreath, I am looking to do some […]
posted: December 18th, 2009 at 8:33 am[…] Puffy Pom Pom Flowers 22 12 2009 A couple of days ago, I made some pom pom flowers following the instructions on Domestiflufff. They were kinda addicting to make, although a little […]
posted: December 22nd, 2009 at 4:29 pm[…] I followed this simple diy at domestistuff for the poms. Add some hot glue to the yarn balls and press them to […]
posted: December 27th, 2009 at 9:37 pm[…] new year RESILution* да! нг донесе наистина нови неща за мен за първи път от много време насам отново съм в обичайното си състояние спокойна, щастлива и готова знам, че този тип постове са много досадни, но трябва да го отбележа по някакъв начин така че ето ви нещо като компенсация […]
posted: January 8th, 2010 at 4:32 amThis is just wonderful. Thanks for sharing this tutorial. Now, going off to buy me some nice colored yarns for the flowers I’ll be making. Hehehe..
posted: January 10th, 2010 at 12:59 amso pretty! posted your lovely idea on my blog & i am sure going to be making these
posted: January 14th, 2010 at 4:27 am[…] could be a nice applique for the ring bearer’s pillow. I also love her idea for these flowers. Cheap projects, but so very memorable. Possibly related posts: (automatically generated)sharing […]
posted: January 14th, 2010 at 4:04 pmThank you for posting this great tutorial! I have been listing DIY flowers all week, and your tutorial has been added: http://skinniepiggie.blogspot.com/2010/01/diy-flowers-set-2.html
posted: January 22nd, 2010 at 12:37 am[…] Pom-pom flowers […]
posted: January 28th, 2010 at 6:44 pm[…] fuzzy yarn and this tutorial I made a “cottontail” for the bunny. My first attempt didn’t have enough […]
posted: January 29th, 2010 at 5:33 pm[…] sweet gift wrap […]
posted: February 1st, 2010 at 2:08 pm[…] leather headband {thief & bandit} his and hers leather footwear {the knot} pom pom flowers {domestifluff} plates and napkins and outdoor table {country living} bride wearing long leather gloves […]
posted: February 3rd, 2010 at 8:12 pm[…] pamuklar gibi bir görüntü vermiş ve eski bir kitapla ne kadar uyumlu olmuş değil mi? Buradan aldık.Bunlar İlginizi çekebilirKendin Yap: Yaratıcı Harika Bir PerdeKendin Yap: Büyük Yer Minderleri […]
posted: February 5th, 2010 at 7:50 amCANNOT WAIT to teach the kids I work with how to do this! They love crafts but our after school program has NO MONEY. We have random 1/2 used skanes of yarn lying around. This will be a PERFECT spring craft! Thank you Thank you Thank you!:)
posted: February 10th, 2010 at 12:25 am[…] i made my uber small…but another lovely kristen @ domestifluff has an easy to follow pom pom tutorial too! step 1: wrap around one finger [the bigger pom pom you want…the more fingers you can wrap […]
posted: February 18th, 2010 at 4:15 pm[…] Подробнее на сайте Domestifluff […]
posted: February 28th, 2010 at 4:35 pm[…] Domestifluff heeft een dergelijke tutorial op internet gezet met voorbeelden van kleinere pom poms of pom poms […]
posted: March 2nd, 2010 at 5:13 am[…] toll aussehen kann. Dazu existieren verschiedene Anleitungen, besonders anschaulich ist diese von Domestifluff (zwar auf Englisch, aber auch ohne Sprachkenntnisse sehr gut […]
posted: March 10th, 2010 at 6:36 am[…] How to make pom pom flowers here […]
posted: March 17th, 2010 at 5:37 pm[…] Pom Pom Flowers – not technically fashion – but certainly cute – Domestifluff […]
posted: April 5th, 2010 at 2:45 pmYou don’t know how long I’ve been on the hunt for pom pom tuts that did not include the cardboard method…thanks! Now I can finally get some projects out the way!…I’m thinking of combining these poms with the felt wreath (:
posted: May 22nd, 2010 at 12:37 am[…] no fresh flower canleave on my desk more than two days. So I made this pompom flowers (instructions here) out of the wool that was left of some past projects. It is easy, it is fast and it would be even […]
posted: May 24th, 2010 at 4:12 pmThese are awesome! I used two images in my post today and linked back here to your tutorial. Please let me know if that’s a problem. Hope you’re having a great week!
posted: June 23rd, 2010 at 11:57 ampk – Thanks – I appreciate it!
posted: June 29th, 2010 at 2:29 pmhello kristen thanks for the toturial . You know what you’re doing with your work, and that’s really a nice feeling, that you’ve created something that wasn’t there before, that’s is you
  . thank youuu ! xoxo , mimie
posted: July 3rd, 2010 at 6:15 am[…] 19, 2010 Hoort bij: Wol — Thea @ 15:52 Dit is toch ook weer een originele manier om een pompom te gebruiken: Geef een […]
posted: July 19th, 2010 at 9:52 amJust used this tutorial to adorn my husband’s birthday gift – easy AND pretty! Thank you!
posted: August 3rd, 2010 at 6:21 am[…] and place card. If you want to carry the pom-pom theme through to your decor, you can use this DIY pom-pom tutorial (also by Domestifluff). I haven’t made these pom-poms since primary […]
posted: August 5th, 2010 at 9:38 amHey.. I used this idea in my post and linked back to your home page and your tutorial.
posted: August 23rd, 2010 at 6:31 pm[…] pon ponları kuru dal ucuna takarak dekoratif bir obje elde etmişler.mor olanı doğadaki aslına epey […]
posted: September 26th, 2010 at 1:24 am[…] pom pom çiçek nasıl da şık olmuş ayrıntısı için buraya… Yazar Eylül 28, 2010. by admin. Kategorisi Genel. Etiketleri . Bu yaziyi sevdim? Twitter […]
posted: September 28th, 2010 at 1:23 am[…] you can add pretty floral designs. Here are various tutorials on how to make different fabric Pom Poms, Chiffon & Tulle flowers, Peonies, and […]
posted: October 7th, 2010 at 5:50 pm[…] out these great tutorials on making simple pom poms, fluffy chiffon & tulle flowers (photo on right), pretty peonies, and […]
posted: October 14th, 2010 at 2:10 pmWow we made these in high school but made the for our pep ralleys. You turned it into a great idea. Thanks for bring back the memories!
posted: October 15th, 2010 at 3:46 pmlove it
posted: October 26th, 2010 at 10:22 amI wish I read this tutorial like 2 years ago. This rocks!!!!
posted: November 21st, 2010 at 9:50 amWow, I love this idea..you are so creative. I can’t wait to make my first one, so fun!!! Thanks for sharing your creativity, xoxo!
posted: November 27th, 2010 at 5:45 pmI may be missing a step or something, but when I tie the string around the ball of yarn that was wound around my fingers, there is a clear separation of the yarn around where I tied the string. It looks separated so that you can see where the string was tied. What could I be doing wrong? I try to pull the string as tightly around the ball of yarn as much as I can but it still seems to happen. Any suggestions? Thanks so much!
posted: November 28th, 2010 at 7:28 pmAshland – What type of yarn are you using? I’ll usually fluff the yarn around the area where the string was tied, and as I trim off the excess that area blends in completely with the rest of the pom pom. This is just a thought but, if you’re using thinner yarn, then it may be why that separation is still visible, even after trimming.
posted: November 30th, 2010 at 5:10 pmThis is a craft I can do! I love this idea!
posted: December 10th, 2010 at 6:24 pmHave a pretty day!
Kristin
So cute the pom pom flower!! I’d like to try it tonight he he… I’m working on the Christmas gifts right now..
Thankx a lot!
posted: December 16th, 2010 at 3:56 pmI’m a little confused on the 4-6 inch piece. do you put it through the center? and tie it how?
posted: December 17th, 2010 at 8:01 pmThis is delightful and, thanks to your clear tutorial, seems a breeze to make! Thank you so much for sharing!
posted: February 19th, 2011 at 9:31 amGreat tutorial! My pom pom turned out perfectly. Linking up at http://www.tangledhappy.blogspot.com tomorrow. Thanks for sharing this.
posted: February 21st, 2011 at 6:12 pmThis is the best idea ever. I can’t afford flowers…but know I kinda can :o)
THANK YOU!!
posted: February 23rd, 2011 at 3:43 pmThank God for people like you who make craft tutorials like this so easy to follow! Right next to me are two small pom-poms I made just a few minutes ago. I wouldn’t have managed without your picture how-to. Now I know what I’ll be making on lazy Sunday mornings!
posted: February 24th, 2011 at 8:11 amreally sweet way of using it, on the journal.
posted: February 25th, 2011 at 12:30 pmI absolutely love these. I have SO much yarn mostly for crocheting, but I need an excuse to get more yarn for other projects, so this was a perfect use for my old balls of yarn. I have so many different colored pompoms around my house now! … Some of them are multi colored. I layered the yarns to make poofier pompoms… and they are so cool!
thank you!
posted: March 22nd, 2011 at 3:05 pmI am going to use this for decoration at a baby shower I am throwing soon! There are going to be mustard and grey pom-poms all around! Thanks for the idea!
posted: April 15th, 2011 at 2:43 pmI used to make these for my roller skates when I was a kid! Don’t forget to use your hair dryer to fluff them. Spritz the pom pom just a bit with water and blow dry to ‘fluf’!!!
posted: June 17th, 2011 at 8:20 amgreat tutorial. I will make it for my little princes birthday
posted: July 17th, 2011 at 5:29 amThanks for the great tutorial. I share it on my blog and link it back to you http://krasart.com/?p=291
posted: August 7th, 2011 at 2:52 amHello! Awesome tutorial. I was wondering if you would recommend a specific type of yarn – I’ve look and many times the yarn I have come across looks to be too thin. Is there a particular brand/type you used?
posted: August 8th, 2011 at 5:17 pmgoing to make my bridal bouquet out of pom poms..thanks for a great idea!
posted: September 14th, 2011 at 7:20 pmThis is incredible! I have been so confused by those cardboard donut tutorials and this one is so easy! I will definitely be sharing this on my blog!!
posted: October 26th, 2011 at 12:16 amApproximately how much yarn do you need to make one of these? I am new to this and I have no idea how many yards to get!
posted: November 4th, 2011 at 12:01 pmrena – I’ve never measured how much yarn is needed, yardage-wise, but I can say that most packages of yarn that you can buy at the craft store will yield many, many pom poms.
posted: November 10th, 2011 at 1:15 pmIf you want them fluffier, try giving them a gentle brush with a doggy slicker brush. The type of brush with the thick mat of tiny, slightly bent wire teeth, you can usually find a small one in the pet section of the grocery store. It will fray the ends of the yarn more and make it more of a fuzz ball than a ball of yarn. Some crocheters use the same technique to brush out finished pieces to look like fury animals!
posted: December 19th, 2011 at 8:37 amSuch cute pom poms! I remember making some in elementary school, but they were shaggy. The fuzzy ones look a lot cuter!
posted: January 26th, 2012 at 7:31 amI use 2 pieces of cardboard cut in a circle (to size desired) punch a hole in the center and with a yarn needle go in and out and around! once done slip a pair of sharp scissors between the cardboard circles and cut. they come out pretty even.
Forgot to say after cutting, tie the center with a piece of yarn before removing cardboard.
posted: January 29th, 2012 at 12:33 pmJust made a few of these with paper clips for the stems. So cute!
posted: January 29th, 2012 at 3:32 pmOh my goodness I’m so addicted to making these!
It took me a minute to figure out that I needed to cut the yarn down closer to the core to make them furry/fuzzy.
Thanks for this most awesome tutorial!!
My granny’s wondering why I’m making so many fuzz balls She’ll get her surprise soon! It’ll make her so happy!!!
posted: February 2nd, 2012 at 9:26 pmThese are so cute! I’m making a bunch for the drama club’s Horton. He has to look through a bunch to find the one with the Who speck on it.
posted: February 11th, 2012 at 12:55 pmThese are great! I love how you showed the difference uses for them too Thanks!
posted: March 30th, 2012 at 12:00 amI know you posted this 4 years ago…but I found you now and I’m so thankful! I HATE the donut method too and yours is SO MUCH EASIER! THANKS!
posted: September 15th, 2012 at 12:06 amI used to make these as a kid and pin them on my shoes with safety pins! A tip when wrapping the yarn – instead of wrapping around your fingers, you can wrap around an empty toilet paper/paper towel roll. You’ll have to squish the roll down a bit to remove the wrapped yarn.
posted: October 4th, 2012 at 11:30 amThis is quite possibly the best tutorial I have seen in yonks – can’t wait to make these and put them all over my house like a crazy lady!
posted: December 7th, 2012 at 7:00 am