
Screen printing is something that I’ve wanted to learn for years, and I’ve finally gotten up the nerve to take my first little steps. I wanted to start slowly, using a stencil and sponge to create my print, instead of jumping ahead immediately and burning screens and all of that.
In this project, I took my inspiration from retro prints and drew some fun retro utensils because I had my kitchen in mind when I came up with the project. I’m a huge fan of retro illustration, and I wanted to get the same grainy, sponge-y texture that I see so much in my favorite illustrators’ works. A small sea sponge was used to create this effect. The print came out so well that I just had to share it!
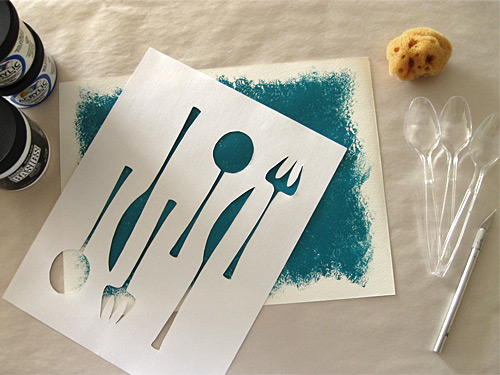
What you’ll need for the project:
watercolor paper, cardstock, or another surface on which to print
flatware template (download the PDF)
Xacto knife
small sea sponge
various colors of acrylic inks/paints
masking or painter’s tape
plastic spoons (for mixing and depositing the paint)
plastic cups (for mixing paint, if you’re making a custom color)
paper plate (to hold the paint)
newsprint or newspaper (to protect the surface that you’re printing on)
Instructions
1. Print the template onto cardstock and cut out with an Xacto knife.
2. Place newsprint under your paper and prepare the background for your print (sorry, I didn’t take photos of this part of the process): If you’re using a custom color, mix your paints together in a plastic cup and, once mixed, deposit a small amount of the paint onto a paper plate using a plastic spoon. Wet the sea sponge and squeeze out any excess water before using. Take the sponge and dip it lightly in the paint, then sponge onto the plate a few times until any excess paint has been removed and the paint is more evenly distributed over the surface of the sponge. You won’t need a lot of paint on the sponge to get good coverage on your paper. Rinse the sponge thoroughly after you’re finished.
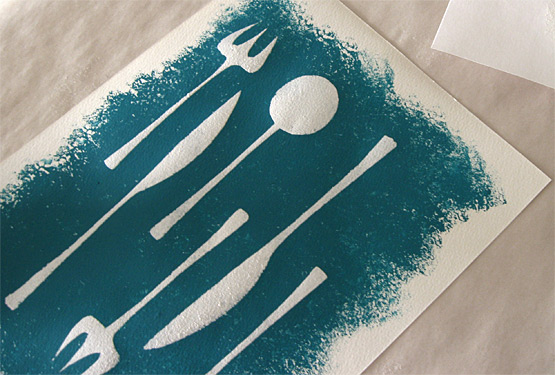
I sponged teal colored acrylic paint onto watercolor paper in an uneven rectangle, but you can use any color and shape that you’d like. You don’t even need a background color if you’ll be making the print in a darker color. Allow background to dry.
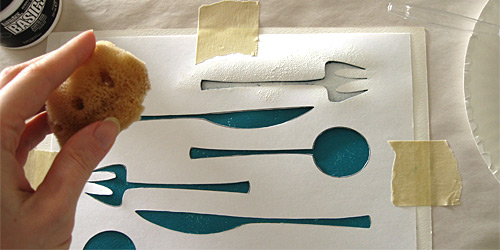
3. After the background has completely dried, you’re ready to create your print. Center your template over the paper and, using masking or painter’s tape, attach the template (see photo above). Following the same sponging technique as in step 2, sponge your foreground color onto your stencil. Depending on the desired coverage, you may need to sponge over the template shapes more than once. Again, rinse the sponge thoroughly after you’re finished.
4. Gently remove the masking or painter’s tape, remove the template, and allow your print to dry. You now have your very own retro flatware print!
If you have fabric ink, you could also use the template in this project to create matching tea towels, an apron, or whatever else you can think of for your kitchen. What fun! I highly recommend Lena Corwin’s book, Printing by Hand, for many great techniques for printing on fabric.
Posted in Craft, Tutorials | 10 Comments »
Oh this is FABULOUS! I would love to link to this if you don’t mind!
posted: February 25th, 2009 at 5:20 pmThanks so much, Rachel. So glad you like the project, and I’d love it if you linked to it!
posted: February 25th, 2009 at 6:04 pmLove the look of this!
posted: February 26th, 2009 at 9:52 pmIt looks amazing! Love the look I’m thinking in doing some paintings for my room and I might actually do this
posted: February 27th, 2009 at 3:34 amThank you, Anne and Cath. So glad that you like it!
posted: February 27th, 2009 at 12:22 pmHi Kristen! I just found your blog let’s see by way of… haha… too much internet surfing but I’m glad I found you! Your blog is gorgeous and so many fun projects! I look forward to visiting often!
posted: March 4th, 2009 at 6:13 pmThanks so much, Traci! I’m glad that you found me, too.
posted: March 9th, 2009 at 10:57 amooh, I stenciled this for my kitchen last week and LOVE it! Thanks so much for sharing. You can check out my version at:
posted: March 21st, 2009 at 7:53 pmhttp://corgipants.blogspot.com/2009/03/also-in-birthday-news.html
That looks wonderful, Jenna! Thanks for posting the link.
posted: March 24th, 2009 at 11:39 amThis is awesome. We used this to make placemats for our kids’ table for Thanksgiving. The kids did the stencils and we covered it with clear contact paper. They turned out great!
posted: November 27th, 2009 at 9:55 pm