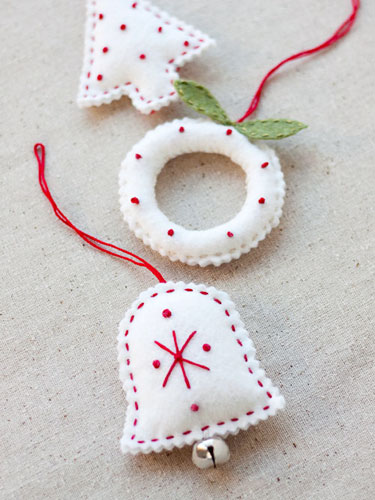
I’ve been working on a pretty ambitious felt tree skirt project this year, and it’s left me with a bunch of leftover ivory felt, so I’ve been trying to come up with some small projects that make use of the felt leftovers. These little ornaments aren’t at all difficult to make, even for beginners at embroidery, and even though they make extensive use of the fancy (and intimidating, so I’ve read) French knot. Trust me, the French knot isn’t difficult at all once you get a few practice knots in, and here’s a a video that takes you through it in real time, so if you’re a visual learner like me you’ll be a French knot pro in no time and will want to use this stitch anywhere that you possibly can.
The only other stitches used in this project are the running stitch and whip stitch. As for the aforementioned tree skirt, I’d love to show you now, but at the rate I’m going it’s probably not going to be done until sometime in 2011, if I’m lucky! Thankfully, these ornaments are much quicker to make. I made each ornament in about 30 to 45 minutes.
Download the templates for this project right here (97Kb PDF file).
You will need the Adobe Acrobat Reader to download and use the template file. Download the reader for free here. These templates are for personal, non-commercial use only.

Supplies Needed
for all ornaments
ivory felt
a hand sewing needle
red embroidery thread
cotton balls or fiber-fill (leftover yarn fuzz from pom poms works great, too)
pinking shears
scissors
straight pins
a marking pen with water soluble ink
a damp paper towel
a small paintbrush or pen
for the bell ornament
a .625 inch jingle bell
ivory embroidery thread
for the wreath ornament
green felt
ivory and green embroidery thread
an Xacto knife and cutting mat (optional)

1. Print and cut out the ornament templates. Cut a piece of felt that’s twice as long as the ornament template that you’re working with, and position the template on the felt so there’s enough room for you to fold the felt in two when you’re finished tracing the template. Trace around the edge of the template using a water soluble marking pen. To mark where the French knots will go, hold the template and felt against a window so you can see the markings through the felt, and use the water soluble pen to mark where the knots will go.
2. Fold the felt in half and pin together using straight pins. Cut around the edges using pinking shears.
3. Use a damp paper towel to remove any ink that’s left along the edges of the felt. Be sure not to remove the dots that mark where the French knots will go. Unpin the two pieces of felt.
4-5. Make the French knots on the piece of felt with the dot markings, using the dotted side of the felt as the reverse. These images illustrate how to make a French knot, but this video does a much better job of showing you how to create the stitch. I tie off each knot when I’m finished since the felt is ivory and I don’t want the zig zags of embroidery thread to show through.
6. When you’re finished making the knots, match up the two pieces of felt as closely as you can, with the French knots facing outward, and pin together the pieces. Stitch along the edge of the ornament using a running stitch.
7. You have a few options for attaching the ornament hanger. Tie a 9-10 inch length of red embroidery thread together at the bottom to create the hanger and either 1) sew the hanger in when you come to the top center of the ornament as you’re stitching around (as shown), 2) attach the hanger to the back piece of the ornament before you start stitching the pieces together, or 3) attach the hanger after you’ve finished the ornament.
8. Leave a small opening in one area of the ornament so you can stuff it. You can use cotton balls that have been pulled apart, poly-fill, or leftover trimmings from making pom poms for the stuffing. Push the stuffing into the ornament using a small paintbrush or the end of a pen. After you’ve finished stuffing the ornament, sew it completely closed.
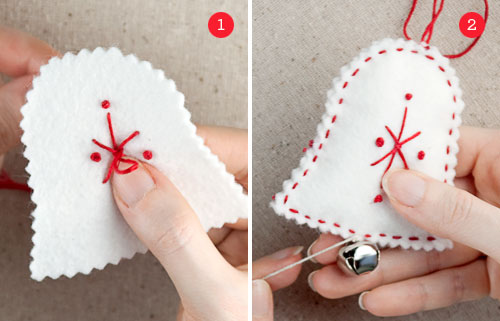
For the Bell Ornament
1. The center star on the bell ornament is made using a long running stitch for each set of points. In order to keep the star in place, make a short running stitch in the center to tack the star in place.
2. To finish the ornament, attach a jingle bell to the center bottom using ivory embroidery thread.
For the Wreath Ornament
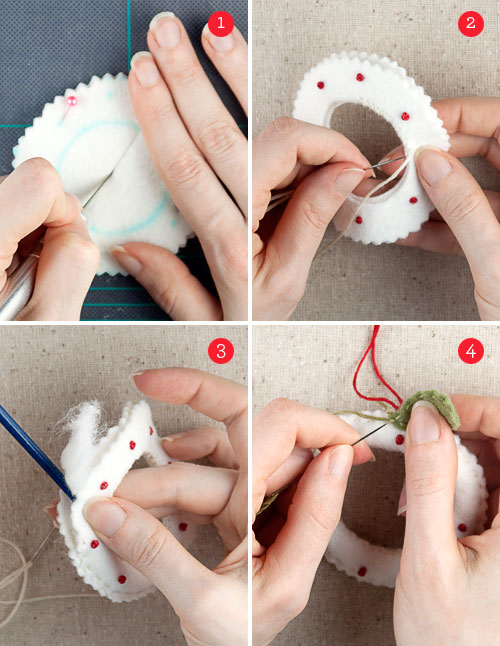
1. To cut out the center of the wreath ornament, I like to use an Xacto knife (on a cutting mat) to cut across the diameter of the circle and then use scissors to cut out the center, but you can use scissors to make a hole and cut out from there.
2. Use a whip stitch and ivory embroidery thread to sew together the center edges of the ornament.
3. Stitch together the outer edges of the ornament using a running stitch and ivory embroidery thread. After you’ve stitched about 1 1/2 inches along the edge, stuff the portion that you just stitched using fill and the end of a paintbrush. Stuffing the circle as you go helps prevent gaps in the stuffing.
4. Trace the leaf templates onto green felt, cut out, dab off any remaining ink using a damp paper towel, and sew around the edges of each leaf using a running stitch and green embroidery thread. Attach the leaves to the top center of the wreath ornament.
Posted in Craft, Downloads, Tutorials | 9 Comments »
ADORABLE!
posted: December 14th, 2010 at 10:26 pmyour felt ornaments look better than mine! beautiful!
posted: December 18th, 2010 at 1:27 amI just wanted to let you know that I featured a link to your blog on one of my blog posts. I just love how crafty you are!
http://porcelainheartivorytooth.blogspot.com/2011/01/linkable-tuesday.html
posted: January 20th, 2011 at 10:10 amThese are fabulous!
posted: November 8th, 2011 at 5:35 amlooks lovely… i’m going to try this…thank you so much for the tutorial
posted: November 15th, 2011 at 6:57 amThese crafts looks so pretty. I’m sure I can do them with my 3 granddaughters.
Thanks you.
posted: December 4th, 2011 at 5:13 pmThese are great! I’m going to do them tomorrow with my 14, 11, and 9 year old kids. Thanks!
posted: December 13th, 2011 at 11:44 pmHallo.
Wow, this is such good felt cafts tutorial. I make this crafts to be one of my new post in my blog, i rewrite again in indonesian language. I want you to know. Thanks and keep posting
posted: January 28th, 2012 at 12:15 amThese are adorable! Thanks for the patterns!
posted: December 13th, 2012 at 3:41 pm